How to deploy Node.js application on AWS with Github
In this article, we will learn about how to deploy a NodeJS application on an AWS EC2 Linux instance and access in browser.
As a very first step, we need to configure an EC2 instance and securely SSH into it. To learn how to create an EC2 Linux(Amazon Linux) instance, please refer to my previous article on “Securely SSH into AWS EC2 Linux instance”.
After successful SSH into EC2 instance, we will follow the below steps to deploy a sample NodeJS application on the EC2 instance:
- Install NodeJS and NPM using nvm
- Install Git and clone repository from GitHub
- Install dependencies
- Run the application
- Configure security group to access via public URL
- Access the application in browser
Install NodeJS and NPM using nvm
Install node version manager (nvm) by typing the following at the command line.
curl -o- https://raw.githubusercontent.com/nvm-sh/nvm/v0.34.0/install.sh | bash
Activate nvm by typing the following at the command line.
. ~/.nvm/nvm.sh
Use nvm to install the latest version of Node.js by typing the following at the command line.
nvm install node
Test that node and npm are installed and running correctly by typing the following at the terminal:
node -v
npm -v
Install Git and clone repository from GitHub
To install git, run below commands in the terminal window:
sudo yum update -y
sudo yum install git -y
Just to verify if system has git installed or not, please run below command in terminal:
git — version
This command will print the git version in the terminal.
Run below command to clone the code repository from Github:
git clone https://github.com/sumant-mishra/node-app.git
This will create a folder with name node-app.
Install dependencies
Now, move to the folder node-app by running below command in the terminal window:
cd node-app
If you check the list of folders using ls command, the current folder structure does not contain the node_modules folder. This folder will be created automatically after installing the dependencies. To install dependencies, run below command in the terminal:
npm install
Start the application
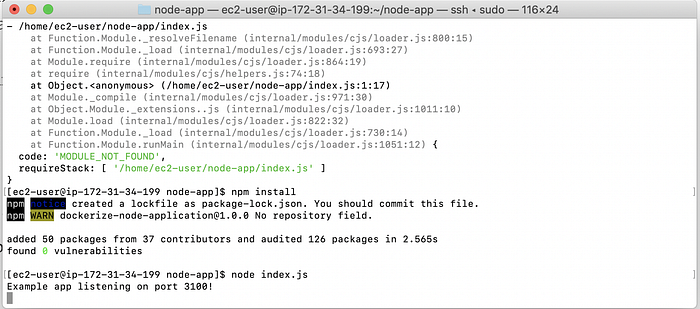
To start the application, run the below command in the terminal:
node index.js
If the server runs successfully, then it should print a message with the port number in the terminal window as shown below:
Configure security group to access via public URL
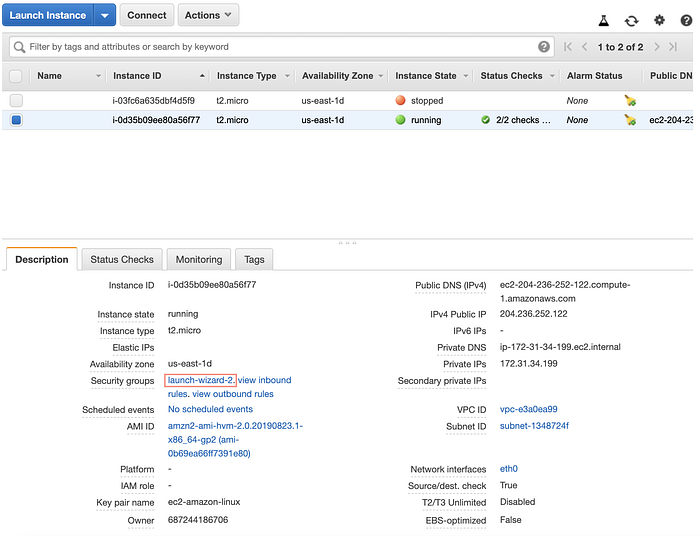
By default, nobody can access the application without configuring the Inbound traffic configurations for the EC2 instance. To configure Inbound traffic for the EC2 instance, follow the below steps:
Select the EC2 Instance and click on the security group link in the Description section.
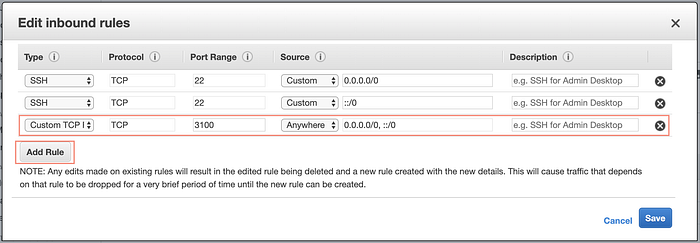
By clicking the security group it will open the Security Group section. Here, we can configure Inbound and Outbound traffic properties. To make our application accessible from anywhere, click on the Inbound tab.

By clicking on the Edit button available in the Inbound tab, it will open Edit Inbound rules popup. By default, it will show SSH configurations. Since our application is configured for port number 3100, we need to add a new rule “Custom TCP Rule”. Enter port range as 3100 and select Source as “Anywhere”. After saving the changed rules, it will allow us to access our application from anywhere.
Access the application in browser
Now, we are ready and can access our application using both Public IP or Public DNS and port 3100 in browsers. For example,
ec2–204–236–252–122.compute-1.amazonaws.com:3100
or
204.236.252.122: 3100
Hope this helps. Please share your valuable feedback.
Thanks!